Nogen af jer har måske opdaget at min blog har været lidt ustabil det meste af ugen – især i aftentimerne. Den korte forklaring er at jeg har udskiftet harddiskene i min server – den lange tekniske forklaring følger her… Læs mere
Kategori: Linux (Side 1 af 2)
Ind i mellem har jeg behov for at optage min desktop i linux inkl. lyd, men jeg kan altid kun huske at det er noget med ffmpeg uden at kunne huske hvordan man gør. I dag fandt jeg ud af det igen, så jeg må hellere skrive det ned 🙂
ffmpeg -y -f alsa -ac 2 -i pulse -f x11grab -r 30 -s 1280×800 -i :0.0 -acodec pcm_s16le -vcodec libx264 -vpre lossless_ultrafast -threads 0 output.mkv
Helt basalt går det ud på at få ffmpeg til at indfange indholdet af x11 vha. x11grab. I ovenstående kommando fanges billede med op til 30 frames per sekund i en opløsning af 1280×800.
Det der altid driller er at indfange lyden. Ovenstående kommando indfanger den via pulseaudio, men det kræver typisk lidt opsætning fordi pulseaudio optager fra mikrofonen som standard.

Med programmet Lydstyrke for PulseAudio (pavucontrol) kan du ændre indstillingerne. Nogle indstillinger er kun mulige hvis ffmpeg kører, så sæt den i gang. Hvis ikke du ser en Monitor of Intern lyd Analog Stereo eller tilsvarende Monitor så sæt Vis: i bunden til Alle inddataenheder.

Når ffmpeg kører har du mulighed for at indstille optageren på Optager fanebladet. Herefter er computeren klar til at optage din desktop. Output filen er i en Matroska (.mkv) container som er klar til YouTube og lign.
Har du problemer med ffmpeg er man ffmpeg eller google din ven…
Update: Dette indlæg er meget gammelt, tingene har ændret sig meget. Alle mine addons kan nu installeres direkte fra XBMC uden at installere ekstra ting. Følg med i de nyeste blog indlæg på forsiden.
![]() I sommers købte jeg mig en ASRock ION 330HT mini pc til brug som mediecenter. PC’en er genial til mediecenterbrug bl.a. fordi den har en Nvidia ION grafikchip som giver mulighed for hardware accelereret 1080p HD video.
I sommers købte jeg mig en ASRock ION 330HT mini pc til brug som mediecenter. PC’en er genial til mediecenterbrug bl.a. fordi den har en Nvidia ION grafikchip som giver mulighed for hardware accelereret 1080p HD video.
Som mediecenter software bruger jeg XBMC, som jeg har gjort siden Xbox 1’s storhedstid. Det er et fantastisk mediecenter og med XBMC 10 (med kodenavnet Dharma) som kommer senere på året, er det blevet endnu bedre. Der er nemlig kommet indbygget Addons Manager – man kan næsten kalde det en App Store, hvis man er til den slags buzzwords, men mere korrekt er nok en sammenligning med plugins til Firefox og lign.
Når jeg ser sådanne muligheder kribler det jo i fingrene, så jeg har naturligvis kastet mig over at skrive addons til mit mediecenter. Addons er skrevet i Python, så det er ganske let at gå til. Det startede med med video plugins til streaming af DR.dk Bonanza og DR.dk Video Podcast direkte fra sofaen og har udviklet sig til en række plugins i samarbejde med et par stykker fra XBMC forummet. Vi lavede for noget tid siden et fælles repository på github, hvor andre også kan bidrage. Pt. har vi følgende plugins klar og flere på vej…
- DR.dk Bonanza
- DR.dk Video Podcast
- DR nu
- TV2 Video
- TV2/Regionerne
- Danish Live TV (Live streaming af bla. DR1, DR Update, 24 Nordjyske, mv.)
- Onside.tv
- Gametest.dk
- Pixel.tv
- TV Guide
Hvis dette skulle give lyst til at prøve vores addons kan de installeres som beskrevet i vores README fil.
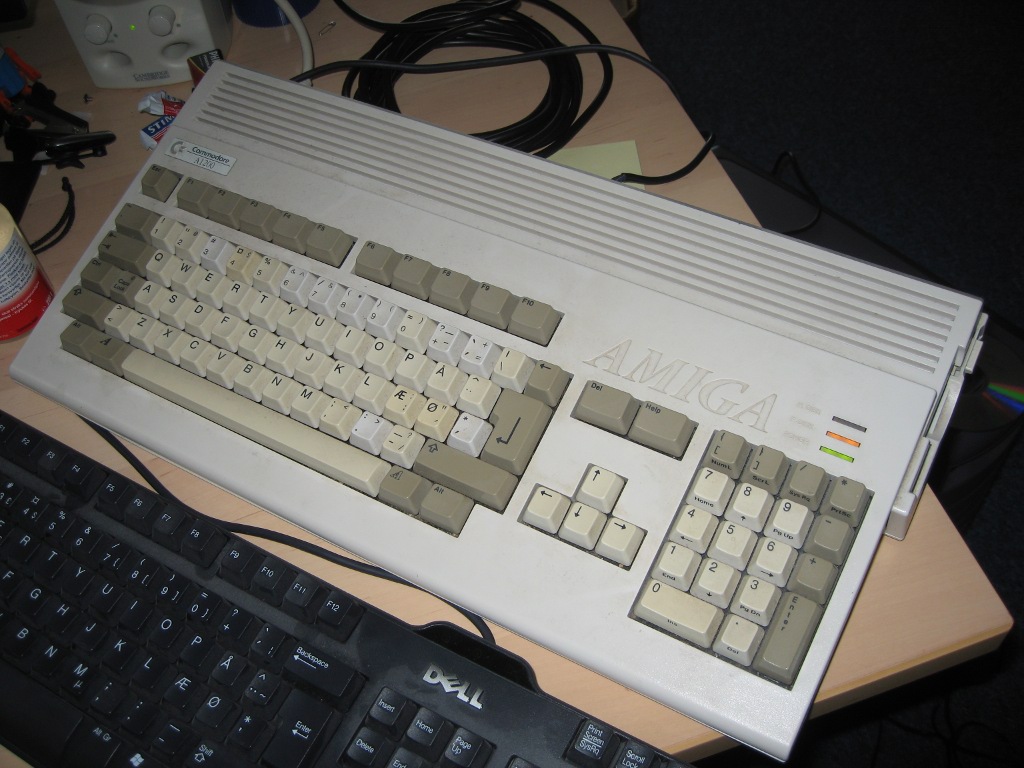
Nu jeg har været igang med at kigge på gamle hjemmesider har det kriblet lidt i fingrene efter at gense nogle af de ting jeg lavede tilbage på Commodore Amiga og tildels Commodore 64. Det store problem er bare at få flyttet tingene over på min PC. Jeg har tidligere brugt CrossDOS som fungerer upåklageligt, men jeg har ikke længere en PC med diskettedrev i og min Amiga 1200 har ikke netkort. Fællesnævneren blev RS-232 og et hjemmelavet datakabel a’la denne opskrift. Det fungerer upåklageligt til at sende fra Amiga til PC – skal der sendes den anden vej flyttes ben 2 – ben 2 kablet til ben 3 – ben 3.
Jeg havde dog ikke de nødvendige stik så jeg endte med at splitte et hun-parallelportstik af og et almindeligt strømkabel og smække det hele sammen med kronmuffer og tape. Det virker upåklageligt 🙂
I Linux sættes serielporten op med denne kommando:
stty -F /dev/ttyS0 19200 raw
På Amiga’en skal følgende sættes op i Serial Preferences: Baud Rate sættes til 19200, Parity slåes fra, kommunikation sættes til 8 bit og 1 stop bit.
Den letteste måde at kopiere Amiga disketter til PC er med transdisk. Der findes allerede en fin guide til at få den over på Amiga’en, så det springer jeg over.
Når transdisk er klar på Amiga’en kan disketterne overføres via kablet. Sæt først PC’en til at lytte på seriel porten:
cat /dev/ttyS0 > diskette.adf
Herefter overføres disketten med transdisk på Amiga’en:
transdisk >ser:
Når Amiga’en er færdig kan du stoppe cat på PC’en med CTRL+C og dit ADF image er klar til brug i fx WinUAE eller lign.


Today I finally decided to upgrade to gutsy on my work PC. I know it’s kinda premature since gutsy is still in the beta stage, but some of my coworkers had upgraded successfully and I had upgraded my home PC’s as well without any major issues, so I thought: “What the hell?“.
I fired up the update-manager and the upgrade process went well without any issues. Upon first reboot my screen setup was messed up. I have a dual screens with a big desktop setup, but now they were in clone mode (same content on both screens). That was fixed by changing the driver in xorg.conf from radeon to fglrx and some other options.
Thought that was not the main issue. Whenever I logged in with gdm, I would get the brown background with a mouse cursor and nothing else, no menus, no programs, nothing. After a bit of messing around I notice that the desktop was loading, just very, very slowly. Like 10-15 minutes slow. I tried a lot of different stuff, but the issue boiled down to network configuration.
During the upgrade the /etc/network/interfaces file was modified and now neither lo nor eth0 was working. I fixed that, rebooted and everything worked flawlessly.
I hope that’s it. So far no more major issues and it’s nice to finally have pidgin, etc. at work.
About a year ago I posted about a small python script that shows a pop up each time a new email arrives in Evolution.
Since then I’ve been working on a new version from time to time and with the release of Ubuntu Feisty Fawn it’s time to release a new version of my code. This time around it creates a status icon and a status icon pop up when new mail arrives as seen below

When the icon or the pop up is clicked the Evolution window receives focus through the use of wmctrl. Unfortunately I have not yet been able to retrieve and display the subject of the email or to select the newly received email when giving focus to Evolution. Perhaps that will happen for v3. Feel free to give me pointers!
The script can be downloaded here.
To run the script you will needs these packages on Ubuntu:
apt-get install python python-dbus python-notify wmctrl
If you needs pointers on how to implement something similar I can recommend Python’s Status Icon doc as well as the Desktop Notifications Specification for communicating with dbus.
In Denmark the government is pushing the use of a digital certificate to identify against most government websites, etc. and for signing and encrypting email. I kinda like the idea so I signed up for one back in ’04. It expired last month, though so I have renewed it, although not without my fair amount of trouble. Apparently Linux and/or Firefox isn’t as supported as they would like the general public to think. (Or perhaps it’s, as usual, my own fault for using beta software – Firefox 2 and Ubunty Edgy).
Anyway, I booted Windows and got the certificate renewed and created a backup. Back in ’04 the backup was actually the PKCS12 certificate file, but that is not the case anymore. Nowadays it’s a plain old HTML file with some in-line javascript that loads the “required” software to install the certificate. PKCS12 is pretty standard and doesn’t require any additional software, so I don’t get why I can’t just have the file directly.
The usual path for the PKCS12 file is to load the certificate in Internet Explorer using the html file, and then export it. But for some reason it’s not possible to export the private key, only the public key. I tried this both running Internet Explorer in Windows and through wine, but with no luck.
At this point I was kinda pissed and figured the html file must have some information regarding the PKCS12 file and surely it did. Looking at the javascript there’s a variable with the name “pkcs12”. This variable is base64 encoded though, since PKCS12 is a binary format. So I quickly hacked together a little python script that extract and converts the certificate, so it’s ready for use by Firefox, Evolution, etc.
If you have the same problems as me you can get the script here and run it like this:
./extractpkcs12.py backup_file.html output_certificate.pkcs
I downloaded Windows Vista Pre-RC1 today. A 2.5 gb download – good thing we have a fast connection at work.
I figured, since we have to return our laptops at work, why not test run Vista on it now. It sucks we have to let the laptops go, but we got some badass desktop machines instead, much better suited for software development. Anyway, the Vista install went pretty smooth, but a couple of drivers were missing, like audio. The cool thing though is that they were installed automaticly the first time I connected to the internet. Neat, and you don’t have to worry about proprietary drivers like you do on linux – since all of them are proprietary. Not nessecarily a good thing, but did make my life easier at least for a little bit.
Vista’s Areo interface is really nice and the effects reminds me a lot of Mac OS and XGL on linux. My 1.6 ghz laptop was measure as a 2.0 with Vista performance tool. The radeon M300 was dragging everything down in the rating, but still Windows feels responsive – so maybe not that big of a deal. Overall Vista is great, but I dislike the fact the everything at the top of the screen – menubars, etc – turn black whenever you maximize a window. It feels like the top inch of your screen is missing.
They funny thing with Windows – when you’re done installing, have run a few of the included programs but not really satisfied with eg. mail program, word processing, etc. you don’t have the option to just download and install something better or different. That’s what I love about linux, apt-get is your friend!
 I’ve been tired of the default brown Ubuntu theme for a long time and for the past couple of months I’ve used a blue-ish theme with this wallpaper. This was getting kinda old too, and looks to similiar to Windows I guess. So I search the web once again for a new background for my computer ‘s screens.
I ended up liking this one quite a bit, and ironically it fits very well with the default brown Ubuntu theme.
If you have a dual monitor setup there’s a bunch of nice wallpapers over here that’s worth checking out.
Once in a while I need to convert some video files so they are playable on my Ipod. I can never remember all the parameters I need to specify to ffmpeg, so I hacked together a small scripts that does all the magic. It does a two-pass encoding of the video file and the quality is quite nice.
You can get the script here. If ffmpeg complains about missing codecs, etc. simply get it from Debian Multimedia.
If you insist on running ffmpeg directly you can try these parameters, that’s what I used to do before I made the script.
ffmpeg -i [in file] -vcodec xvid -b 384 -s 320x240 -qmin 2 -qmax 5 -bufsize 4096
-acodec aac -ab 96 -g 300 -pass [1 or 2] -passlogfile /tmp/ffmpeg.stats -f mp4 [out file]